Tuesday, February 28, 2012

Customizing gunpla base on the gundam original concept (OC) versus personal concept (PC)

I know this post is a bit lame but since after I joined some forums, it really change my mind about gunpla customization. I used to think that straight build will be the best and forget about the word customization. As long as I clear all nub marks and all paint went smooth on the surface, it should be perfect. I think I start to paint my gunpla about 2 to 3 years ago and started to realize customization is something fun to do but there is always one problem that I face (or some amateur modeler) is from where the customization start, what are the steps and how to get those steps done (considering on skill, tools and material as well). What I experience is whenever I try to do start it without a plan, I will always end up with lot of mistakes and the worse part will be the result turns out negatively. I always think of creating my own concept for every gunpla kit that I’m going to build but this isn’t easy for me to get there (especially when I restricted from my wallet, space and time). I always think that if I can get those tools and material, I can be as perfect as other but the fact is I can’t even master the tools and material yet, how can I get there? So, my solution for myself now will be take more time to understand and learn what I got before I can get to another level. The reason I wrote this post is simple, the trend of customizing kit is growing no matter in OC or PC. It is great to see lot of masterpiece out there so the amateur (like me) can study more and expose to different concept.

The first step for customization will be the concept before anything start, maybe I should explain what is OC and PC base on my own definition in gunpla. Customizing gunpla base on the gundam original concept (OC) is basically improving the gunpla model kit in terms of detail up, improving joint or proportion, adding more panel line, pla-plate, re-paint, casting new part (such as adding armor or weapon) and adding customize decal that related back to the original gundam concept but the overall customization done on the kit will still remain the original concept of the gunpla (gundam).One of the most important thing to remain the gunpla customization in OC should be the color scheme. Whenever the gunpla re-paint, majority of the color selections should be similar to original color scheme. Converting gunpla kit to another gunpla such using MG Freedom inner frame and transform it in to Justice to make a Justice MG Format can also be categorize in OC in my definition. As long as the end result is what we can find in gundam series, it should categorize in OC. It might feel boring on building and customizing a gunpla kit base on the gundam original concept but sometime, OC can be better than PC and it can be harder to get it done especially when improving some old MG to match up the latest MG. 

Scratch build or using conversion part should also consider in OC as long the end result is what we can find in gundam series.  

\

Thursday, February 23, 2012

Project MG Destiny EBM AIF Detail Evolve version.. Start toh..

I know the title "Detail Evolve" is a bit too heavy (promising) for me to use. Well i should said this two words belong to Master Keita in my dictionary but i'm going to get some idea from his project (using his concept) and try to apply into this kit. Of course, it won't end up as good as he does but hopefully i can get some basics similar to it. From this project, i starting to re-evaluate my skill and what i found out is " i can say my skill in pla-plate and panel line design still in phase one". I still not good in using overlapping pla-plate, different surface panel line combination, pin-hole position as well as color separation. I guess i really need to improve these skill in the coming project before i start playing with putty, resin or re-casting parts which i think most professional modeler do ( and i always limit with supplies). While i still improving this stuff, i saw some of the pro-modeler are moving or starting on painting tiny figure recently which made me think "there is always some place to grow in modelling". 

So, back to the concept i use for this kit, i do some study from other MG or MG conversion Destiny before and since this kit had been release for quite some time, there are lot of customization sample or reference for me. The thing that notice is the method or the concept of customizing kit this kit or the overall gunpla have been growing in both "following the original concept" or "fully customize on modeller's concept" Many things come into my mind when i want to write about this and i think i should write this in another post). My choice for deciding the concept of this kit will be follow the original concept which use the original color scheme, remain its own image and add some customization which study from Master Keita's MG Strike Freedom "the details that evolve" version. Since i'm lack of tools and supplies, zero knowledge on putty, most of the works i did on this kit are adding pla-plate, panel line and "some minor" armor trimming. I used to think that "Detail Evolve" concept was armor trimming and try to expose the inner frame as much as possible but i think there should be lot of definition on it and it depend on what the modeller want. So, lets check out the photos for more elaboration.


Monday, February 13, 2012

MG Destiny EBM review part 3 (Articulation, proportion, recomendation)

Alright, this should be the last post for my boss's unit. After this, i will start working on my own unit which is going to re-paint entire kit. Since this unit doesn't own by me, i only capture the photo of it without decal because i afraid while i posting it, i might damage some of the decal (maybe i will capture some photo of the complete straight build unit with complete decal and markings on the completion of the re-painted unit post).

For part 3 of this review, i will start with the articulation of this kit. Since this kit was release few years after the launch MG ver.2 (better articulation with better inner frame design) for many UC series gundam, the inner frame, joint and movement were top notch for this kit. Although the are some obstacle for the wing unit but other parts like legs, arms, torso and neck joints were all work very well. The arms can reach every weapons (there are some difficulty for the arms to reach the Double Edge 2 (beam boorang)) without any problems. Dynamic poses can be easily created from this kit with its extreme well design joints for the pegs, torso and shoulders. Some of you might think because i am Seed/Destiny fans but all i can say is, i have been not building Seed/Destiny MG for sometime. The last Seed/Destiny MG kit that i build (straight build) should be the MG Sword Impulse which was almost one and the half year ago. During this time, i have build some great articulation kit from MG Exia, MG wing and MG Sinanju till some bulk almost not moveable gunpla kit like MG ZZ and MG FAZZ. I still feel this MG Destiny is one of the best articulation gunpla kit.

The proportion design for the kit also contribute a lot for this kit to create dynamic poses. I do mentioned that i prefer on the NG 1/100 proportion over this MG version but recently, i realize why are the legs was design this way (too thin). If you check out the dynamic pose of this kit from the boxart, you can actually notice that the legs is slim ( stretch) all the way down. Although this can be done by using ultra-wide angle (around 16mm with close distance focus) lens but how many people can afford such lens and how many people actually realize and know how camera can help to stretch the proportion of the kit to look more dynamic in different poses. So, my conclusion regarding on the proportion design from this kit isn't having the legs too tall or the arms are too big but it was made to look good in different poses. If you know how to pose and get the best angle for the shots, even the normal standing post (with long and thin legs) will look very good. 

Before start viewing the pictures, suggestion or recommendation for this kit customization. Of course you can't miss the reference from his MG Format Destiny conversion from Keita for those detail and the recent work i found for M.A.C forum, LotD's Destiny Evolve . These are some of the superb version MG Destiny out there. From my own recommendation, if going for original concept mod should be adding excessive detail to create some sort of "detail evolve" version since there are still lot of place where adding more panel line, armor cutting to expose more inner and PG detail painting style on the inner frame. Check out the Keita's Strike Freedom detail evolve version if want to know more on the concept of the adding detail modifications. As for other concept such as adding armors, change or add more weapon like what LotD did on his modification i can't find much example to show. 
So, enough for the words and lets check out the poses. I using some of the extra clear part from the EBM version as well.


Friday, February 10, 2012

Seven6398.blogspot.com 2012 New Begining officially launch (with 2011 summary)

Last year, i mentioned that i'm going to do some renovation to this blog (i forgot last year or this year in January). Well, the renovation is finally complete. For those who have follow my blog, you will the changes i made in this blog for past few weeks.At first, i thought of making it like a upgraded version and name it as ver.2 but since i'm not good with HTML code and don't know where to find some interesting and sophisticated gadgets add into sidebar, i guess i will just name it as "The New Beginning" because i just change the look, size of some sidebar item, re-organizing and added some links. The reason i use the theme call "The new beginning" is because this year i will focus on improving the basic of my gunpla skill, creating some extremely clean gunpla kit (still with some minor modification) which will take lot of time which i mean i might not able to create lot of gunpla kit this year (patience needed for a clean gunpla kit). So, the Seven6398 is finally back from the space and floating in the sky of "Earthhhhheerdd".... (i mean the background). Here are some new thing in the blog:

First, re-design the new header with the pictures of my previous work and the size that fit the entire page.

Wednesday, February 8, 2012

MG Destiny EBM Review part 2 (parts and assembly)

Here we have the part 2. For Seed or Destiny series MG, the building sequence is a bit different from old MG kit especially from UC series ( i mean those MG come after 200X if i'm not wrong). First, it will start with the upper torso, then head unit, follow by arms, legs, waist unit, backpack and weapons. I hate build arms and legs cause i need to build the same thing twice (in MG from UC series, the sequence is a bit different which require me to build the arms and follow by legs first which save the best part at the end). 

There are three four things i want to mention about here related on the building process. First will be the nub marks. For this kit, most of the nub marks are easily expose out which its not easy to cover for straight build unless i paint the entire thing or cover with top coat later on. Why? There are many color from its color scheme and its not easy to find the right gundam marker with correct color to cover it.

Second thing will be the special gimmick for most of the MG from Seed and Destiny series, sliding armors. Those armors also can be easily detach from the inner frame for painting purpose without removing some part from the inner frame. This should be one of the good thing but the counter part will not favor for painting if there is no plan for disassemble the inner frame for painting ( paint with slide, paint without slide, one for priming, one for painting).
Third thing, there are lot of detail from the inner frame ( i guess now Bandai applying this concept into armor as well, the MG Duel which come in this month). Good thing is if you want to practice on detailing the inner frame like what Matt Tomzek did on his PG GP01Fb that win the G-shot contest, you can have it in this kit and the only person i know he can did very well on this, Mr.Chang (ngeekhiong) will be the best reference. As for the detail in the armors, that will need some creativity or maybe you can refer to this post  from master-killar which i check it recently. 

Last thing? the building process isn't that difficult but it also require some focus on "left, right" part especially the legs. Although most of the part from the leg are duplicate to another but some do have different for left and right side (the wing unit as well). Alright, enough for the talk and you can check out the pictures now. 


Sunday, February 5, 2012

MG Destiny EBM Review Part 1 (My boss first lootz)

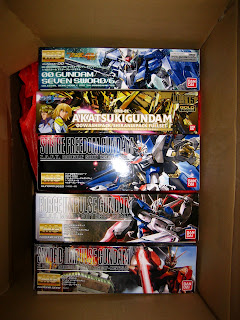
Remember i told you guys about my boss was poison by Seed and Destiny series, these are the kits that he bought and ask me to build for him. Total of 9 MG which include the MG destiny EBM (Extreme Blast mode) in this review. He asked me to recommend what are the best kit to collect from Seed and Destiny and OO series, i recommend him about MG kit and he said he want to buy the entire MG series of it ( he almost did it). So, i brought him to some local gunpla shop and pick all MG series kit according to the series he bought and he was a bit shock there are so many MG Seed and Destiny gunpla. The best part is when i told him that there are more MG coming out for Seed series and his expression like... "er". I think that's what make him not going for the whole MG series from Seed and Destiny and OO in one time and only pick those most famous MS in those series. And the gunpla kit he bought were: 
-MG Strike Freedom
-MG Infinite Justice
-MG Destiny EBM
-MG Force Impulse
-MG Sword Impulse
-MG Astray Red Frame Kai
-MG OO Raiser
-MG OO Seven Sword
-NG 1/100 Akatsuki full set

The bill was RM 1789, it was the craziest loots i ever see. Well, as for now will be the best time for me to re-sharp my skill from basic which build snap and fit project for all these gunplas. The only request from my boss is snap and fit all these gunpla with the provided dry transfer decal and markings (i will be dead if he ask me to paint all of these and he also know that it take lot of time for me to complete it if he ask me to paint all of them because i need to do review for other people as well). 
Since i own most of the gunpla kit listed above (except MG OO Seven Sword and MG OO Raizer and most of mine are straight build version), i will paint my gunpla kit too since i can re-learn the everything from these gunpla while i build for my boss. It means two same gunpla kit start at the same time which one will be straight build for my boss and the other one will be fully painted (might add details) for myself (Feels like the professional style, haha, unfortunately i'm not in that level yet T_T).


TagLine

Related Posts with Thumbnails