Friday, March 11, 2011

what will be the aftermath (Japan 8.9 earthquake)

I was sleeping during the event happen and i saw it when i open my Facebook.. i was like.. 8.9.. it was the highest after what happen in China in 2008.. but as it happen under the sea.. the damage can be larger.. well.. don't underestimate the power of water.. around 6 point something of the seismogram measurement able to create a large tsunami that can wipe out entire Acheh in Indonesia 2004. 5.xx something of earthquake make a loud cry in some other place last year.. is it the event that we talk about the polar shift that going to happen in 2012 really going to happen?.. it started to sound scary.. hope those who were affected is safe..

back to the story.. aftermath huh.. well.. i guess as a big country that always prepare for this big event.. proper pre-caution always been ready but it all depend on how strong is the power of the nature.. we are not sure how worse is the condition yet as the end have not meet for current moment.. what i concern for the aftermath are the thing that related to the international product, business, economic and other that rely much from Japan.. sounds like speaking about something huge.. it just some simple stuff.. as the tsunami hit most of the coastal area.. and we have seen lots of bots being push back to the land.. i think most of the shipment related to japanese gadget, electronic stuff, some fresh food material for sushi maybe and our hobby stuff will definitely affected.. model kit, figure, paint and a lot other thing might be able to export out for the coming few month until the recovery stage reach to a steady level.. other than the shipment.. supplier are all affected as well.. i heard that much of the online hobby shop like Hobbysearch and HLJ are affected.. HLJ even stop their business for few days to clean up the mess.. i hope they were safe and able to recover as soon as possible as Hobbysearch had been my main sponsor for certain period of time and support this site a lot..

well.. since this post is about aftermath.. i want to share some view on what will happen in my place too.. related to hobby stuff.. in the coming few months.. i think the price for most of the hobby collection stuff from Japan will rise as you already can see from ebay.. model kits, figures, paint, toys and many more.. we can say those reseller are immoral of doing so but they are the one who suffer more than us as they might can't get enough stock for us for the coming months.. so they will have to increase the price to slow down the sales while maintaining their profit and survive in the business.. i guess this will happen to all other places as well.. and also other industry too..
the next thing.. will the value of the Japanese yen drop and inflation increase in Japan as this event will also affect the Japan's economic and many other foreign investors in Japan?.

lastly.. god bless those victims who affected..

Wednesday, March 9, 2011

PG OO raiser tutorial

I received email that requesting me to provide tutorial on the metallic PG OO raiser i made, so i decided to share it here as well. 

 And here is the tutorial on how i create my metallic PG OO Raiser. I can't show it in a video or adding picture on it as i already assemble the kit but i will try to describe the steps as much as possible.

as from the blog, all the material i use were showed in this link.

http://seven6398.blogspot.com/2011/02/pg-oo-raiser-metallic-verv-complete.html

but some other stuff that not show are just the stick, polystyrene and crocodile clip to hold the part for painting.

I'm using airbrush but not canned spray, so i can control the mixture of the paint and of course, better for the paint's cost. :)

Like usual, first step is all about snap and fit. Then try to study and remember the structure of the kit as much as possible.

After the snap and fit which i called it pre-assemble process (cause i won't snap it properly for most of the part so i can easily detach it for paint, but some other part that you don't plan to detach it and can paint it in one piece; then you can leave it), i will try to see whether what i should i add in ( the entire plan of the kit such as re-paint, adding pla-plate or panel line, customize the color scheme or other).

This also the part the that determine the amount of material, time and painting process ( like one painting process for the legs, arms, chest, waist and other to ease the usage of the compressor, even though my compressor is consider as medium or large size in hobby compressor but it still can overheat if use it for too long). 

The next thing will be detaching all the part that need to be painted separately and this is also the process for cleaning nub marks, find the place where the parts can attach to the sticks or the crocodile clips. A very boring process where i need to sand all the nub marks away ( i do it in a lazy way which i only sand the surface that have nub marks but not the entire parts cause the Mr.surfacer will do for other surface)

Then, its painting time. Do care about the mixture of the paint.

-Surfacer plus thinner (Mr.surfacer 1200 plus Mr. Hobby thinner), ratio can be 1:3 or 2:4, it is depend on your painting style. Thicker mixture can ease the painting process by only two layers needed but might stuck the airbrush if too thick. Thinner mixture smooth the airbrush but it take few layer to make it look nice and also need further distance for the airbrush and parts that needed to paint. This theory can applied to other paint as well but not on the metal color cost the thickness of the original paint is thinner.

-after the priming process and before the color painting process, do check the surface of each part especially those parts that you're not going to separate it like the sliding mechanism on knees and the elbows. Bend it and prime the hiding surfaces. This process same for painting as well.

-the fingers part looks the most difficult part but its actually quite easy. You can choose to separate all the parts for painting but if you feel those parts are too small then you can leave it in one piece and paint like the knees and elbows.

-so, the most interesting part is how to get the metallic look. I'm actually use the most simple way which all rely to the paint itself. I hate sanding so most of the time depend on high grade surfacer which is the Mr.Surfacer to create smooth surfaces but some surfaces with nub marks are still require sanding and i still add in surfacer on to of it.

-i use most of the metallic color such as metallic blue, metallic red and black steel color from Mr.hobby. Then the gold color from Mr.hobby again. i was thinking to use the silver chrome for the silver color to cover most of the white color parts but because i made a mistake on purchasing metal color alluminium, i mix it with metal color silver chrome. The result is actually better than just using metal color silver chrome cause the metal color alluminium give smoother surface then metal color silver chrome that stand alone. (thinner added and majority of the ratio fall more on Metal Color Alluminium)

-there is one annoying thing about the silver color is the color can be easily fall off if no top coat apply on it ( mine doesn't have top coat). So, if there is a layer of gloss coat on it will definitely make it look even nicer and can protect the paint.

-in terms of decal and marking, better use water slide type cause the dry decal can stick off the paint during the application. ( that's why i don't apply much decal here).

after all these, the kit is complete. As for the photo process, i think you can refer to the link i provide above.

had been sick for few days.. can't start the painting process on HGUC Stark Jegan.. hope i can finish it by next week.. 


Saturday, March 5, 2011

Second Thought on MG ShenLong to Altron (is Nataku that what i want to mention)

sorry for the confusion of the title and what i told from the previous post for this post.. it is not altron gundam that i want to mention but it is Nataku Gundam.. so the title should be the similarities of the latest MG Shenlong kai and Nataku gundam.. lets look at the picture and i will tell the story below the pictures..


the parts in the red circles are the design similarities i want to point out in between the MG ShenLong and Nataku.. first is the ankle design.. then move on to the knee, waist, chest and shoulder design.. this is significant that the new MG Shenlong kai is design base on Nataku which explain why the design is not look like the TV version Shenlong.. part of that.. just like the MG Deathschyte EW which also used the design of Deathschyte gundam and the Wing EW or Wing ver.ka using the Wing Zero custom design.. this new MG Shenlong is using the same concept but just a little bit different from the Nataku.. MG Deathscythe EW, MG Shenlong EW and MG Wing EW / ver.ka all are using the custom version design from Endless Waltz movie but TV version color scheme.. 

remember what i mentioned in previous post from last few month regarding that the real MG Shenlong TV version might release.. after looking at the design.. i think an MG version of Nataku will be more possible to be release out soon.. maybe end of the year.. just like the MG Deathschyte to MG Deathschyte custom..will my speculation become true?.. we will see..

all images are stolen from GundamGuy.. hehe..

what should i post for next post?.. should be the next WIP of HGUC Stark Jegan..

Friday, March 4, 2011

HGUC Stark Jegan WIP 2

Not much here.. just want to show some of the additional parts from M.S.G added into this kit.. and i also try to add some pla-plate on some plain area.. i try with the normal cutting way which using knife rather than the scribble which make my place dirty and the cutting area is not precise enough.. knife is a lot better but i need a metal ruler in order for me to cut it precisely.. still not precise enough.. some of the smaller parts of the pla-plate are cut by scissors.. much more faster but not that nice..

alright.. forget about the pills and that stupid 32mb memory cards..


try to make some nice ass here.. haha.. and guess what.. 

i got myself a new HGUC Unicorn (destroy mode).. i was hesitating whether should i buy this or HG Avalanche Exia but i end up with this.. since i feel that what about getting the 1/100 version for the Avalanche Exia or the MG version might pops out.. 
there are many types of color scheme come into my mind.. first was Banshee version.. but i don't know how to create the V-fin.. luckily i found this post from g-tyro that show how to create the Banshee version dragon V-fin.. i also think of other color scheme like the Ana version and also blue unicorn.. but i won't be doing much on this kit soon.. it will be my relax kit..

next up (MG Shenlong and the possibilities of MG Altron soon) 

Tuesday, March 1, 2011

1/144 Alteisen WIP 2

alright.. moving to pre-assemble process now.. the process that i can see the finish product..

interesting.. small in size.. lot of detail.. most of the parts are molded separately.. most important.. no foil sticker needed.. most of the tiny area are painted except for the legs.. it still in the pre-assemble process.. i can't test out the articulation yet cause most of the parts will fall off if i try to move it (i haven't connect all the parts properly yet).. but this kit will definitely able to give out a dynamic look.. even just from the standing pose..

but again.. flaws.. some of the parts can be quite loose even after i assemble the parts properly.. the part that i refer is the lower leg armor in the front.. hope the paint can help.. the second problem is the joint in between most of the parts.. the male side of the joint is thicker than the female side of the joint.. the good thing is the parts won't be easily separate from each other.. but the bad thing is it quite hard to connect those parts.. i'm not sure is it i'm too sensitive or it just normal.. i feel the plastic material that use by this kit is slightly different from Bandai Gundam Model kit.. not saying the quality is good or bad.. but i can feel the tendency of this plastic material used in this kit is higher and being pull strongly.. the parts also have thinner plastic.. it means that if i try to bend it.. it will break instantly but it is not easy to bend it or break it.. other than that.. i will write more under the pictures..
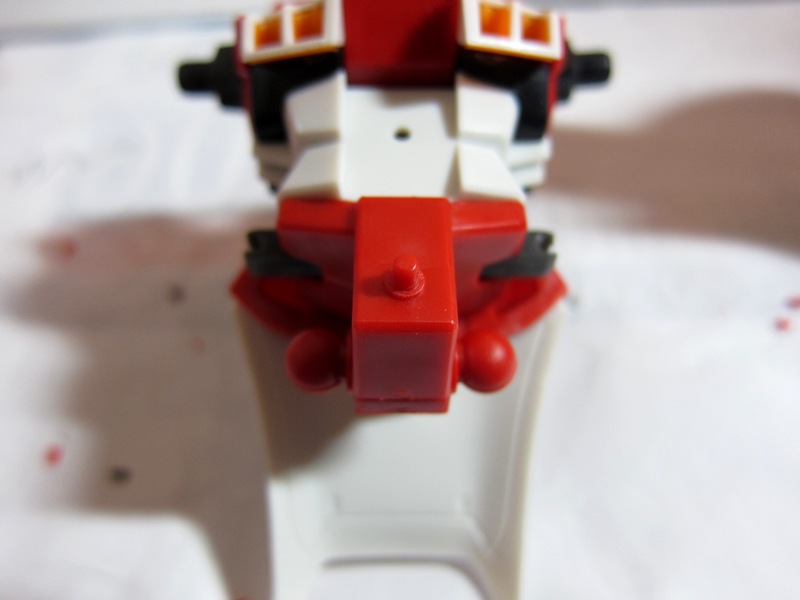


i like this design a lot.. like the normal revolver gun.. wanna play some Russian Roulette?. XD..


while i try to slot in the white armor.. one of the thruster keep on pops out.. that is what i mean on the plastic material..

this can be one problem for posing.. the ball joints are too short.. the tight can't move much and will easily fall off..


the left cannon is actually blocking the fist from the left hand.. is this a flaw too?
overall.. this kit is quite good.. i think there won't be much problem after i finish the entire project of this kit.. what do i plan for it?.. will show on the next WIP of this kit.. and as mentioned from the previous post..
this will be next project.. second WIP coming soon..

Stay tune..

TagLine

Related Posts with Thumbnails