
Wednesday, December 12, 2012

Saturday, October 13, 2012

Saturday, September 22, 2012

Thursday, September 13, 2012

Wednesday, September 5, 2012

Sunday, September 2, 2012
Seven6398 ver.2
Wait, this is not a ending post for Seven6398 but it just a ending post for this blog.
Well, there are many blog about gunpla shutting down recently, its like leaving it "unattended". Well, there are many stages in our life. From kid to teenage, young adult, adult and etc etc etc........ As we move into different stages, our lifestyle change such as.... income (hurray!!!) and also time on spending for different stuff. As some of you that still following my blogs, you might notice that i have not been very active recently such as lesser post per-month, slower progress on completing gunpla as well as miscellaneous update around here. All I can say is I had move to from my college life to working life now and as usual, lesser time spend on other thing than working but have more "resources" to acquire hobby stuff. It is unavoidable, we have to adapt but remain what we still can and where we want it to be.
Damn, it really sounds like I'm going to end Seven6398.blogspot.com. For your information, Seven6398 will not die as long as I'm here. Its just a move from one account to another but 80% of the stuff will remain the same. Its just like move the soul from one body to another body. So, for more information about where it move and the detail after it move, please follow this link:
Saturday, August 18, 2012
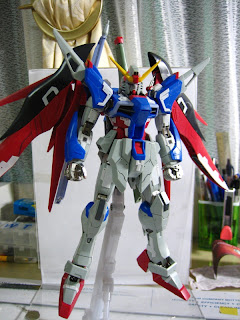
MG Strike Freedom review part 3 (Proportion, articulation and pose)
So, it can be said the final post for this blog before it move to the next one but this blog will still remain the same. Lets start the third part of MG Strike Freedom's review.
Start with proportion, this kit has a lot of improvement over its predecessor (MG freedom). Although it still suffer some weight issues when i try to pose on with display stand but it still can pose very well without giving me problem such as fall off parts. The proportion for this kit is just "good enough" but not perfect yet. There are lot of modification that make this kit look even sharper. This original proportion make it stable in terms for pose, weight distributions and articulations. Non of the parts neither too long, too fat nor too big. Therefore, this kit has a very well proportion but there is lot of room for proportion improvement. Of course the non-grade 1/100 version can't be compare to this even though it convert from MG Freedom frame because this MG Strike freedom is using its all new inner frame after all.
Talking about the inner frame, it can be said it improve a lot. Except the neck joint, Xiphias 3 joints and ankle joints are still using the ball joint type, others are change to "i think i shall call it as multiple bar joint" which is more solid. This type of joint might be a bit too stiff and complicated but it is more sturdier and works better for most of the main parts such as legs, connecting lower and upper torso (MG Freedom using ball type joint for its waist joint which make the upper torso always come off due to the weight of its backpack when it display in normal standing pose for some time). But i'm not trying to said the ball type joint is bad because it also very flexible for some other series. Overall articulation for kit was very good compare to it predecessor MG Freedom which rely on ball type joint a lot.
As for the poses, check out my photos. With sturdier and more flexible joint, it can lot of dynamic pose from shooting, slashing to.... flying. I don't take photos with lot of ground pose as what i know most of the action for this mobile suit was on the air ( i try to make one but i failed). Like usual, raise up the shoulders armor and spread the legs as wide as possible, pull the arms straight and use the widest angle of the camera... VOW LA!!!.. Here comes the dynamic pose.

Friday, August 17, 2012
MG Strike Freedom review part 2 (detail, structure)
I almost miss this part and make the part 3 of the review straight away. Most of the people own this kit but if you haven't this might help you a little bit for understanding more about this kit (in my way).
So, for the part 2 of this review kit will focus on few things which are the detail, structure and the assemble process. Lets start with the detail for this kit, since this kit was come release during 2007 where lot of ver.2 U.C series MG released such as MG Mk.2 ver.2 and MG Zeta ver.2, the inner frame for this MG Strike Freedom was improve a lot from its predecessors MG Freedom. Unlike the latest RG which improve the detail of the outer armors, this generation was emphasize more on its inner frame details compare to the latest generation. (basically we can't expect any ver.2 of this will release in the coming... 5 years maybe)
In terms of the structure design for this kit, there are lesser ball type joints but replace with multiple socket joint. Since the MG freedom was suffer a lot from its weight issues (especially the wings), I think this is one of the major improvement in terms the joint to give the entire kit sturdier. (will discuss this more in part 3 of the review).
MG Seed/destiny series can be said the most famous in its sliding armors mechanism especially the tights and knees. These are the most complicated part in the assemble process but the hardest one will be the wings unit (will show more from the photos below). As for others, it pretty straightforward.

Wednesday, July 25, 2012
MG Strike Freedom Review Part 1 (Boxart and runners)
It's my favorite mobile suit turn this time, "Strike Freedom.. ike masszz!!!!!!!!!!!!!"...

The first gundam series that completed which is in 2005 was Mobile Suit Gundam Seed Destiny. I thought Shin Asuka was the main character that time and i don't even realize there is Mobile Suit Gundam Seed which Kira Yamato is the main character for these 2 series. I remember when it first appearance in the anime already show how deadly this mobile suit is (plus the "super-coordinator" as the pilot) but the pilot choose to use this as deadly weapon to disable other mobile suit rather than killing the pilot ( like what Kio in gundam age FX doing now "kio, you're not the first one who fight that way, hahaha" ) "how holy can it be". It's predecessor Freedom gundam was almost invisible except the battle with Providence Gundam and Impulse gundam but with the upgrade weapon system to this Strike Freedom gundam (combination with pilot ability), it become even more powerful from any other Mobile suit in its era (cosmic era). Some people might hate the concept of this mobile suit and its pilot because its too powerful and this is why i like it so much.
The concept of this mobile suit was almost perfect in any attribute. It is agile and strong (in terms of offensive and defensive) due to it power by ultracompact hyper deuterion nuclear reactor that provide unlimited of fire power, propulsion and energy armor. Two beam saber which can combine for any short range combat, two beam rifle which also can be combine for both medium and long range combat, "Xiphias 3" cannon which effective against any energy shield or underwater combat, "Callidus" multiphase beam cannon ( which also similar to positron/ plasma cannon but in smaller size), "Voiture lumiere" propulsion for confusing enemy target censor, two energy shield for defensive and lastly, 8 DRAGOON (Disconnected Rapid Armament Group Overlook Operation Network) units just like what the OO gundam series fang, Age series Bits or the UC series funnel. With such weapon system and unlimited energy from its powerplant (which most of the mobile suit in any series suffer), even the most powerful Gundam Unicorn might have doubt for taking it down ( just my silly opinion). No matter in space, atmosphere or ground battle, 1 on 1 or like (Ip Man " i want 10") will not be a problem for this mobile suit. The only drawback should be the stamina of the pilot although he is a "supercoordinator".
Alright, enough for the introduction and lets get back to the kit.

Monday, July 16, 2012
MG Sword Impulse review part 3 (proportion and articulation)
trying to squeeze down the delay this time...
I didn't take much photos from the previous MG Impulse 's' i bought few years ago. My skill for stretching it dynamically for the photo was not good enough in that time. I was thinking to re-shoot this kit when i free and i think this will be the good test out for the kit and lighting system.
So, from the assemble process already show how well that this kit can pose. The articulations were great and most of the joints work very well. One thing that must be highlight is it won't have any problem when doing dynamic poses such as falling skirt armors. Another great thing is the joint for this kit is very sturdy even after it built for few years (my old one is still standing very well and those joints still hold a lot of different pose).
As for the proportion, it really give me feeling of robot damashi or STANDart gundam feel. No matter how i pose it, it still look great. But there is still one draw back for the entire kit proportion design which are the legs slightly too long ( it was mentioned from someone else i forget his/her name when MG Force Impulse released). I do agree with that and if the lower torso (abdomen) was slightly extend its length might make it look better.
Although everything look good from review part 1 till here (boxart, runners, color separation, detailm structure, design, proportion, articulation, blablblablabala.....) but there is one problem with this kit, the weapons. Huge sword or gun is nice but when it come to posing, weight and size (as for this will the length) does cause problems. For example, if you want to take photo with the entire sword combine in the picture might make the mobile suit itself look too small. The extra HG/NG manipulators use for holding the sword is another issues which it can't really hold it "tightly".
Well i guess that's all for the words, let the photos explain the rest:

Sunday, July 8, 2012
MG Sword Impulse Review part 2 ( assemble, details and structure)
Alright, finally I'm back.
So, this post will be the part 2 of the review for this kit which will related to assemble process, detail and structure.
First, i will start with the assemble process. Basically everything is straightforward, no complicated assemble process like the MG SF wings or mesh pipe for MG Mk2. All of the steps only involved direct snap and fits, there not much complicated multilayer snap and fit process. This means it will be easier for painting because most of the part can be easily disassemble. As for the detail, i will elaborate it from the pictures.

Friday, June 15, 2012
MG Sword Impulse Review part 1 (boxart, manual and runners)
Alright, another new build. Basically this will another OOB kit that i going to build for my boss but before that i'm going to create my own review about this kit.

How the first photo look like? Sword Impulse was in WW2!!! Damn, i really love the way they design the boxart for MG Seed especially this one where it destroying Orb Fleet. This scene should be around episode 20 plus after Orb signing the treaty with the Earth Alliance and starting to assault Minerva after it sail of from Gibraltar. Whenever Shin put on the sword silhouette, that's the killing time except the first episode.
So, the specification about the mobile suit itself, i'm sure most of you know what it got such as weapon, power output and other special gimmick stuff but i still want to cover a bit here. The mobile suit itself was design to be flexible which can equip with different silhouette for different ability such as Force Silhouette, Sword Silhouette and the Blast Silhouette (similar to Strike Gundam). One thing that improve the flexibility of Impulse gundam is it's separable body part which divide into chest flyer, core splendor and leg flyer (similar to RX-78 2, ZZ gundam and also Age 3 gundam). This flexibility enable it to change it damage part such as arm, legs, main censor or camera which is the head unit and also it silhouette pack during combat within certain duration. Impulse gundam itself already equip with beam rifle, expandable shield (with Force Silhouette mode), two "folding razor" (similar to Armor Schneider) anti-armor knife and CIWS mounted on the chest (instead of the head). Without any silhouette pack, Impulse gundam itself already quite deadly.
As for this kit, it come with Sword Silhouette which its more focus on short range or melee combat. With sword silhouette, it give Impulse additional weapon which is the 2 x "flash edge" beam boomerangs and 2 x "Excalibur" anti-ship sword. Although the sword was called as anti-ship sword and it look not as flexible as normal beam saber but it is more destructive compare to beam saber especially attacking strongly armored mobile suit like GFAS-X1 Destroy gundam. With the design of the sword which more "tangible" to beam saber, it can even stab through the shield of Freedom gundam. Even though the sword silhouette was made to enhance Impulse gundam in short range combat, Impulse still able to carry its original weapon which is the beam rifle and shield unlike Sword Strike gundam. The only pitfall for Sword Impulse might be the mobility which it can't operate as flexible as Force Impulse on the air combat.
Tuesday, June 5, 2012
Gundam Mid-Year Challenge 2012 (Malaysia)
I almost put the wrong name on this event as the theme/title of this event always change. Last year was GWBC and before that is BAKUC, this year should call as GMYC as short form. I was there on the day it set up. Luckily the day before the set was also the event for Power Ranger which host by the same organizer so the set up can be done a lot more earlier. Participants were only to display their work around 2 a.m. on 3rd June.
At the same time, LYN which is Low Yat.Net forum also hosting a straight and OOB group build category with the theme back to basic. It is a very interesting category as there are many modellers still not master basic very well and straight go on customizations especially ME. The seller from M.G.S2U (Tkting) told me the same thing as well when he look at my submission.
Another good thing for me is able to meet rayloke from Lowyat.net which also one of the professional modeler in http://forum.zerogunz.com if i'm not wrong. He is one of the who organize the group build for straight build or OOB category. I was sitting in a group who participate in that category but too bad i can have some chat with him for some.... gunpla mod.
So, lets check out the photo of the event and as for the detail rules, prize and others, please follow this link:

Saturday, June 2, 2012
Painted Bandai Action base
I seldom paint the base for my gunpla since it was only use for photography purpose and most of the time i want it disappear from the photo but not this time. The reason i painted this action base was due to the gunpla competition in Sungei Wang Plaza starting on next Monday but modeller can display their gunpla by tomorrow night. For the previous entry which were the MG Vanator and MG FAZZ custom, i didn't use any stand because the MG Vanantor was something for fun while the MG FAZZ custom was too big for the action base. I'm not trying to say this base will help my coming entry win anything but it just some satisfaction or the feeling of completion for the entire project. I don't think i need to introduce much about this display base. I got few of this actually and it really got the potential for building a hangar diorama. And lastly, forget about the HotWeels in the photos, bought them from a promotion buy 2 free 1 ( guess its going to be my new line for collection, haha).

Wednesday, May 23, 2012
MG Destiny EBM AIF Detail Evolve version Completed!!!

Colors
-White (Mr.Color White mixed with Mr.color Flat white)
-Black (Mr. Color Metallic black)
-Dark Gray (Mr.Color Metal Siver mixed with Mr.Color Metallic black and Mr.Color Flat white)
-Blue (two layer, first layer with Mr.Color Blue mixed with Mr.Color Flat White and Mr.Color black, second layer with Mr.Color cobalt blue)
-Light Blue ( Mr.Color Cobalt Blue mixed with Mr.Color Flat White)
-Light Green (Mr. Color Green mixed with Mr. Color Flat White)
- Red (Mr.Color Metallic red mixed Mr.Color red)
-Silver (Mr.Color Metal silver chrome)
-Gold (Mr.Color Gold)
-Base (Mr.Surfacer 1000)
-Added pla-plate in various area
-Added panel line in various area
-Added M.S.G part in various area
-Armor trimming
-Armor Drilling
-Water Slide Decal (finish with Mr. Mark Softer and Mr. Mark Setter)
-Panel line with Uni pin Mitsubishi pen 0.2
Since most of the original decal was ripped off from this old kit, i have to replace all those decal by water slide decal. It can be said my first kit that fully applied with water decal using Mr. Mark Softer and Mr.Mark Setter. What i learn is the most important thing about applying the water decal is patience, must wait until the first water decal dry before apply another one on the same part or area. ( i mess up and destroy lot of those water slide decal).
The inner frame color was similar to the RG Aile Strike AIF which is going to be my story for this kit. (How should i start it?)
"After the final war, ZGMF-X42S codename Destiny was heavily damaged by ZGMF-X19A Infinite Justice with most of the part were destroy except the main body which is the upper torso. The damaged Destiny was send to Orb after the peace treaty reached from all side in between ZAFT, Earth Alliance and Orb union. With the original MS capability, Advance Inner Frame which develop in the AIF Aile Strike was use adapt into Destiny for re-building the entire MS to increase the capabilities during the operation on Earth which affected by gravity. And this become the second ZAFT MS equip with both Ultracompact Hyper Deuterion Nuclear Reactor and Advance Inner Frame."
Enough for words and its time for photos, enjoy.

Saturday, May 12, 2012
Will be back soon.....
I thought everything still can be normal even though i start my full time job but things really not happen as what i expected. Office hour? off on weekend? that will only happen in dream. What really happen is, reach home around 8 pm every night and almost working every weekend, it's really tired to focus on building gunpla after work and only able to work on current project during off day. Catching up with updates from various sites most of the time. Hope everything will get stable and get back to this hobby as usual soon (gunpla life). So far, this is what i've been busying......
 From previous update, i mentioned that i'm working on this MG Destiny EBM detail evolve AIF version. Well, it can be said complete but i haven't got the time for photo shooting yet. I prefer to review it after the shooting complete and guess what, i think i'm going to participate the coming BAKUC Malaysia again (with this). Well, it's not going to win or get anything back for me but sometime it just fun to display our work in real to other. Complete album for this kit should be out around next weekend. So..... will be back soon.

Wednesday, April 18, 2012
Relieve from duty (Sponsorship)
I'm not sure do i use the right word "relieve" for the title.
Don't be afraid, the title of this post or the purpose of writing this post is not because i'm going to quit gunpla or this hobby soon, it actually refer to sponsorship. I'm not suppose to write this post as it can become quite sensitive to many parties but i still decided to write as an update for the writer of this blog which is me.
For the past 2 years, i has reduce the purchase of gunpla a lot because i was able to get some sponsor from some online hobby shop and instead of getting money for advertising their banner, i chose using gunpla as the trade. Due to some sensitiveness, i couldn't review the value of this trade but it is not something extreme. And i'm really want to say thanks and appreciate for their support toward this blog. Recently, i took up another sponsor which is more challenging than the previous advertiser. They offer me some great offer but in return, i also have to sacrifice and contribute more than before. It was a good deal but i just don't have enough time to get the rewards mainly due to my current situation. At the end, i decided to cut this deal few weeks ago.
The reason i cut the sponsorship from this party is not because of something negative, we close the deal peacefully and we're still friend. I just started my full time job and most of my time, focus or energy had spend on my job. i just couldn't keep up on building and review model kit for my sponsor and instead of performing badly, i rather quit before anything get worse. Tough choice for giving up the opportunity to get something wanted without using money.
From all of these, it made me realize few things. It is fun to get something without using money but it does require other efforts, instead performing badly better quit it before anything get worse and lastly, never overestimate yourself. Its really fun when i see the parcel arrive at my home and i'm getting those gunpla without paying money but it really feel uneasy when i saw the visit in my site dropping as the reason why some of my sponsor giving me free gunpla is because i have some readers (which is you) in the blog and could see their banner when they visit my blog. I'm really obsessed with the number of visits to my site that time because i'm afraid if it drop, my sponsor might not continue sponsoring me. In fact, some of my sponsor do not care about the visits on this blog much actually and i'm really don't know what should i worry about. As for now, my blog is actually free of sponsor although there are still a lot of advertisement banners. I don't need to worry anything anymore and everything goes back to normal like what i use to be, blog whenever i want to. As for 'visits', its just a number. My main purpose of this blog is to share what i feel its fun to do.
How should i continue this hobby without sponsor? well, like most of you guys did, pay on my on since now i'm working and i should be able to spend for my own hobby but.... but that doesn't mean i do not accept anymore sponsor, it depend on the deal. And... and.. i'm not blog for money, I BLOG FOR GUNPLA!!! So, anyone of you want to sponsor me?.... hahahaha....
Sunday, April 15, 2012
SD Gundam Action Figure DeathScythe video review
MG Destiny detail evolve ver. AIF coming soon..
Wednesday, April 4, 2012


Tuesday, April 3, 2012
SD Figure Gundam Deathscythe Hell
This should be my first time reviewing a figure and this will also be the first post for this month. I heard this kit after the sd battle online Taiwan version became popular and i think most of these sd figure are actually base on the design from that game. It's the other way round compare to other gundam game which most of the gundam or mobile suit in the game are design base on 1/144 kit.
For the first time reviewing figure, i'm really don't know what criteria. Maybe i should use back the same criteria which i use to evaluate those gunpla kit. In my opinion, figure should always be some that come with lots of details, decals and color separation will be done properly. Although most of the figure great on the three thing i mentioned but there are something that figure always suffer which will be the seam lines, mis-shape or might lack of articulation (unless it is the Metal build, Robot Damashi or Revoltech). Some people value figure as toys, some as collection and some feels that is the masterpiece like owning a Ferrari but it all depend on which type of figure. As for me, of course i wish i will collect these "Metal build, Robot Damashi or Revoltech" type of figure but most of them are not cheap. I remember Mr. NgeeKhiong said "although figure can be expensive compare to plamo and you might even create something better than the Metal build which should consider as the highest class of the gundam figurine (put aside the 1/1 RG gundam) but time will always be our restriction to create something huge, unique and beautiful master piece as what ever you call it. For those people who want great gundam collection but do not have the time to build it, gunpla figure will be the best alternative." In fact, i am starting to becoming one of them now (spend most of my time on work rather than holiday and work on this hobby) but that doesn't mean i'm stopping plamo.

So, i can't said this is a good figure especially compare to those SDX series but i can't said it is bad figure either judging from its price. All i can said is this sd figure series is something in between SD plamo and SDX series. Compare to normal sd plamo, this sd figure actually using different type of material. The plastic feels more like dry rubber which is very strong and heavy. Screws are use to connect most of the parts. As for the joints, most of them are fix ball joint type which means that is is very hard (almost impossible) to take out the arms or legs. As for the details, it got something that SDX series have and those color separation are just nice but it still suffer the normal figure flaws which is the proportion, seam lines and mis-shape (can be not counted since it is under SD category).
Thursday, March 29, 2012
MG Sazabi Review Part 3 (summary)
Again, i lazy to choose the right music for the video. All i do was choosing some sound track from that series and do some sound editing, cut there, paste here and combine. I added some scene reviewing the box, packaging and building process together with the complete unit scene.
I might doing some similar video to other kit that i will build in the future. Hope you all like it.
Saturday, March 24, 2012
MG Sazabi Review Part 2 (proportion, articulation and pose)
I remember someone told me that kotobukiya 1/144 Alteisen from SRG was a flying brick because it can't really pose and i feel this MG Sazabi will have the same title especially both also red. It depend on what type of kit you want and how you want it to be. If you start this hobby or collection less than one or two years with the most recent Master Grade, you might have higher expectation on every MG and this kit might disappoint you. Well, all i can say is there are many thing we need to understand on why some kit design to be like this or that, when is the kit release, the technology, trend , concept of the model kit during the time of kit design and release. From there, we will actually able to see a lot of good stuff from the kit itself instead of complaining this or that when it compare to the current Master Grade kit. I think there might be some people asking for a MG Sazabi "Ver.2" but i think there are also many great modeller have bought the resin, conversion or G-system version MG Sazabi which have better proportion and articulation.
Proportion
So, I'm going to discuss about proportion, articulation and the pose that this kit can make in this post. First, i will start of with the proportion design. For me, i got no complain and everything was almost same in the anime and even looking from a model kit perspective, i think the proportion design is great but there are still room for improvement. I saw many modeller tend to sharpen many area on this kit. If you look at Keita's Sazabi, he sharpen the face plate, slightly extend the chest armor, etc... and it will look even greater.
Articulation
As for the articulation, i think you will know what i'm going to said when i said this kit also share the title of "flying brick". If it build with the straight build kit as the end result, it can be tough for it make different pose. From the previous review part 1, i mentioned that most of the major joint (for the entire hand to the chest and entire leg to the waist) was using ball joint. Ball joint is suppose to be flexible but not durable. What happen to this kit is those joint can't really hold the main part properly due to the size and weight. As a result, those main parts such as legs and hands can easily detach but i might due to those PC part are still new and not soft enough to hold the main part. It should be alright after some time when those PC part get softer after connecting with the ball joint from the main part. Like what i said, ball joint is flexible but not durable. In order for this kit to have durable ball joint, those female part of the joint which is made by rubber (PC runner) was design as deep as possible. Good thing is it help the joint to hold the main part properly but the bad part will be the flexibility of the ball joint decrease. Most of the main part will using the similar concept and i think that is why that this kit can't pose well or i can say that this kit can only do standing pose. You can said the articulation is bad for this kit but it wasn't design with the articulation technology or concept that we have recently in its time.
Pose
It can use "forget about it" when it come to posing this kit but standing pose is still a pose. From what i said on the joint, more or less you will know how much can this kit pose. Most of the joint of this kit is consider as a dead joint which mean it only use to connect one part to another and there are not much movement can provide from those joints. So, ground pose is definitely not suitable for this kit ( it can't recreate those pose in the anime when char do those jumping pose this mobile suit on the asteroid while fighting with amuro). Usually i will try to make some take some shots for the kit with the stand to create some pose on the air and try to get some dynamic shots from there but the size, weight and there is almost not room for the stand's connector to hold this kit, i totally give up on it.

Tuesday, March 20, 2012
Re-supply (pain in my wallet)
Re-supply, phase one complete. Actually, these are just part of the supply and there are more coming soon. If you see what item i bought in the first picture, you should know what i'm going to do next. These are the paint that i'm going to use for my MG Destiny, hope it will turn out as what i want. As for the Koto Joint, bought it for the MG Sazabi modification. As for those brush, no plan for it yet (might learn some hand painting soon).


Metallic black (my favorite), silver chrome and gold for the inner frame, metallic red ( i don't want it but it work away too good with other red), flat white just to make sure everything really white, cobalt blue is a need and metallic blue is my favorite again.

I'm not sure how much it can help, i was planning to use epoxy putty to re-cast the joint but the seller told me why not use Koto Joint only remind me that kotobukiya has come out with impressive solution to solve articulation problem.

Good thing is the local shop( i bought these stuff from two different shops) just re-adjust the price for the paint tool since Japanese yen drop a lot recently but everything here still cost me almost RM 100 and i still haven't get surfacer, cutting mat and epoxy putty. Damn. My order on MG strike freedom coming soon, i'm really broke this time........
Saturday, March 17, 2012
MG Sazabi Review Part 1 (structure, building process and detail)
I start the assemble process last week when i thought i just want to take some photos for the first part of the review which cover the boxart, parts, runners and the entire package. Things get too exited when i open the box and i can't stop myself to build it up. I even make the video for the boxart or package review plus some assemble process. Instead of watching 3 minutes video on the finish product, the video will also cover other stuff like building process, manual, inner frame and others in roughly about 10 minutes video for the entire review.
So, back to the main topic. I saw this kit when i was 15 and know nothing about it at all. The only thing i know is this kit come with huge shield, those bulkiness are awesome and the price tag for this is something beyond my reach. At last, i get it now and i'm reviewing it. I only finish the Mobile Suit Gundam: Char Counterattack series yesterday after i finish assemble this thing to check on some action pose (and i think i found some weakness of this mobile suit, lol). Although this thing look bulky but in the anime, the mobility is very high (especially in melee combat but those scene only last for few minutes) and it even can make some Sinanju Kick on Amuro's Nu gundam. Unfortunately, the real kit can't do that. What weaknesses that this mobile suit have? do you remember the Nu gundam pull off one of the "pipe" near the neck area of this mobile suit which i believe most of the wiring that connect the entire suit to the cockpit (head unit) disable Char controlling the mobile suit. I mean how can such important "pipe" being expose out from the armor. The second thing is, do you realize that most of the Zeon mobile suit such as Gelgoog , Dom or Zaku version XXX look bulk? the reason is not because it got better armor but it got a lot of thrusters (and some cooler vent maybe) to improve its mobility (my opinion, just like American muscle bigger car, bigger engine, faster on straight line) but what i think is bigger size means heavier (might be a problem since it is space combat unit) and exposure to enemy will also higher. I'm not saying the design is bad, it just what i think base on some military basic concept. Maybe there are other reason that this mobile suit design and develop in this way since i haven't check out the full detail about this mobile suit. All i know about this kit will be the weapon, some sort of psycho frame technology which allow the pilot to control funnels, some kind of plasma beam cannon on the lower torso, one beam rifle, two beam sabers can be release direct from the arms to the palm, some tomahawk missile from the shield and a huge beam saber/axe.
Detail and Structure
As for this model kit, it was release around 200X (before 2005)and i can't simply expect that everything from this kit is as good as what the latest MG have but this doesn't mean it can't catch up at all. The design of the inner frame for model kit is actually quite impressive and flexible if anyone want to paint it. On top of that, the inner frame might not have much detail but those hydraulic pump gimmick plus the thrusters beneath the armors are impressive. Although those inner frame for the main body and legs are impressive but there are certain part of this kit doesn't have inner frame such as the arms unit. Other than that, there are a lot of ball joint use as the connector for most of the major part such as the shoulder and peg joints. Ball joint should be good in terms of flexibility but the problem is the sturdiness can't last long and the it can easily detach (If you have a MG freedom, you might have experience this from the waist joint). So, on the overall of the structure from this kit is very solid but not flexible ( i will explain this more in articulation part).

Monday, March 12, 2012
MG Infinite Justice Review part 3 (proportion and articulations)
Some of you might complain the pictures are too dark, some of you might say the shadow might too strong and some said the color is nonsense (haha, Jeremy's style). I actually trying out to get a total dark back ground while controlling the flash only hit the subject and i guess it not work well but i think i found the solution. Sorry if the picture look a bit dark.
Other than the picture, this proportion and articulation will be the main topic in this review for this kit. Anyone of you own the NG 1/100 Infinitite Justice before? well i have one and i have lot of complain about it even this MG version was not release yet. So, on the proportion section i will mainly focus on the comparison with the NG 1/100 version. First, the head unit finally become a normal scale compare to the NG version which had the head unit too small to fit for the entire kit. Most of the weapons such as beam rifle and shield were look sleeker and sharper (even the beam for the boomerang). The legs are not too long which i saw some people complain about it on the MG Strike Freedom and MG Impulse. The only complain that i had on this kit will be the beam cannon from the Fatum 1, i wish it can be slightly longer (will i do something on it? no, it too small and i don't think i can handle it yet).
So, on the articulation for this kit, fantastic. If you check the part 2 of this kit review which i show those joint, you will know how good this kit can pose. The most important thing is those skirt armors are not blocking the legs for posing. On top of that, the armors from the legs and arms were not the issues for posing. With the back stay vertical way on ground pose, it won't have any weight issues but i'm good in ground posing so i didn't make any. There are some for the ground pose although everything look perfect, the backpack might obstruct the kit for making the kneeling pose. Other than that, no complain.

Sunday, March 11, 2012
MG Infinite Justice Review part 2 (detail, assemble process and structure)
I almost forget to make this post and post the third part of the review. I was thinking where are all the pictures that i want to talk about? So, here it is. In this part, i'm going to focus on three things which are the details, assemble process and the structure.
So, first we had the details. I'm sure most of you had heard about this kit and some of you even own one of it. If you prefer to detail up (i mean painting) the inner frame of MG kit, this kit will be my suggestion. It come with lot of detail not only on the inner frame but those hidden area for thruster as well (the backpack). I actually took some photos of the inner frame before i assemble everything (just scroll down).
As for the assemble process, it's pretty straight forward. Although it come with lot of tiny part because most of the part are molded separately and the joints are just incredible. From the assemble process, it show it almost perfect to make any dynamic pose (all you need is a close up wide angle lens). Due to most of the parts are molded separately, there are only few foil stickers come with this kit and mostly are use as the censor in the head unit.
In terms of the structure, the thing that i want to point out is this MG Seed/Destiny series are design more focus on the inner frame. The inner frame can stand alone independently without much supportive part from the outer armor to hold everything together. On top of that, most of the armors are easily detach from the inner frame. I remember i took some photo with some of the armors off from the inner frame with mechanical chain base. Other than the design, most of the main joints for this kit are very sturdy. What i means is those joint that connect legs, arms, head unit and backpack. I feel the sturdiness of those joints are even stronger that the parts to build the joint itself (so, be careful when it come to pose to prevent those part break). Good thing is those joint can last for long period but posing the kit might be a bit difficult. While the main joints looking good, other joint or clip for weapons or accessory are not that good especially the shield. Hope the paint can help by thickening those part. There are lot of people complain about the clip on the palm are useless but for me, i think it works pretty well (better than old type MG series such as MG strike, MG wing ver.ka, etc...).


Wednesday, March 7, 2012
The.. Big.. Red.. One.. is here!!!
It took so long for it to complete its journey from Japan to Hong
Kong and finally reach Malaysia, haha. I was waiting at my home for two
days when i know it reach Malaysia and i was crazy whenever i heard van
or truck engine pass my house but at last, i was not at home when it
arrive (damn). So, this will consider as this month's loots. I really
can't wait to build it.
 And
this is the new line that i'm going to review, the SD Gundam Action
Figure. Something new for me as i never purchase or review any figure
before. Lets see what it got on my coming post.
And
this is the new line that i'm going to review, the SD Gundam Action
Figure. Something new for me as i never purchase or review any figure
before. Lets see what it got on my coming post.

Tuesday, March 6, 2012
Project MG Destiny EBM AIF Detail Evolve version (update)
Alright, backpack is done, pla-plate process is done too. I guess that's all i want to add it in and the next thing i'm going to do will be sanding before go for priming and painting.
I have no idea what to do with the wing at all. There are lot of curve and uneven surface which made me very difficult to cut the pla-plate according to the uneven surface and the shape of the wing. I think of doing some armor trimming but i don't have the right tools. So, i guess that's it for the wings and backpack.
I have no idea what to do with the wing at all. There are lot of curve and uneven surface which made me very difficult to cut the pla-plate according to the uneven surface and the shape of the wing. I think of doing some armor trimming but i don't have the right tools. So, i guess that's it for the wings and backpack.

Monday, March 5, 2012
MG Infinite Justice Review part 1 ( with a little bit of update)
While my study completed and waiting for the convocation, i still trap in something which made me quite busy for these few weeks. The reason is all about money and time, i got a lot of time to do anything i want now but the problem is everything need money which i running out of it. Therefore, i might spend more with more time i have and the best way to cut of spending and use those free time wisely will be, working or look for a full time job. I went for few interviews last week and almost every day, there is a new interview coming in since i can apply it from the Jobstreet easily. My schedule was a mess. Some of the interview success and some of it still pending means fail. My mom told me one thing, be patient and wait for the most suitable one when i told her why not i simply pick one of the job and spend my free time to get money while looking for other job. She said i won't quit the job that i simply choose once i'm in it (due to many "predicted" reason), and the best part is, "isn't you have lot of gunpla (from my boss) in the room and why not you build all of it while you're free", i was like "am i dreaming?"
So, that's all for the my updates and back to the next review item, the MG Infinite Justice. If you build a MG Destiny, you should build a MG Infinite Justice too (So you can have it fight each other). This kit was release around 2008 or 09, i can't remember but all i remember is i bought it around RM 165 that time and now it cost about RM 175 to RM185 in most of the local hobby shop (since Yen has increase a lot recently). Well, i think i don't to put out the introduction of this gundam since it's partner Strike Freedom gundam was so famous no matter how much you like it or hate it. What i want to share in this part one will be the design of the gundam itself. So, let me start of with the concept of this gundam. It was design to be melee and medium distance combat mobile suit compare to Strike Freedom which have a lot of beam rifle. Improve from the old Justice gundam, this thing have more beam now and the Fatum 1 (the backpack which is a detachable flying unit) look more aero-dynamic. I mean if any gundam think of fighting it in a close combat, it's kick equip with beam while the right hand holding 2 x Super Lacerta (beam saber) combine together and the left hand equip with shield plus the beam boomerang which can use as beam blade when it attach on the shield. The wing of the Fatum 1 equip with beam as well and when the enemy try to run away from it, it still can fire the enemy without using it beam rifle by its beam cannon mounted on Fatum 1. The best opponent that i think of, Exia but most of the blade that Setsuna like to throw on it will deflect by Griffon (the knee blade or beam) and block from the shield (haha).

A very dynamic pose in the box art and it should a scene that it fight with Destiny gundam while the Legend gundam was looking on it and ready to provide some support to Destiny gundam.
Tuesday, February 28, 2012
Customizing gunpla base on the gundam original concept (OC) versus personal concept (PC)
I know this post is a bit lame but since after I joined some
forums, it really change my mind about gunpla customization. I used to think
that straight build will be the best and forget about the word customization.
As long as I clear all nub marks and all paint went smooth on the surface, it
should be perfect. I think I start to paint my gunpla about 2 to 3 years ago
and started to realize customization is something fun to do but there is always
one problem that I face (or some amateur modeler) is from where the
customization start, what are the steps and how to get those steps done
(considering on skill, tools and material as well). What I experience is
whenever I try to do start it without a plan, I will always end up with lot of
mistakes and the worse part will be the result turns out negatively. I always
think of creating my own concept for every gunpla kit that I’m going to build
but this isn’t easy for me to get there (especially when I restricted from my
wallet, space and time). I always think that if I can get those tools and
material, I can be as perfect as other but the fact is I can’t even master the
tools and material yet, how can I get there? So, my solution for myself now
will be take more time to understand and learn what I got before I can get to
another level. The reason I wrote this post is simple, the trend of customizing
kit is growing no matter in OC or PC. It is great to see lot of masterpiece out
there so the amateur (like me) can study more and expose to different concept.
The first step for customization will be the concept before
anything start, maybe I should explain what is OC and PC base on my own
definition in gunpla. Customizing gunpla base on the gundam original concept
(OC) is basically improving the gunpla model kit in terms of detail up,
improving joint or proportion, adding more panel line, pla-plate, re-paint,
casting new part (such as adding armor or weapon) and adding customize decal that
related back to the original gundam concept but the overall customization
done on the kit will still remain the original concept of the gunpla
(gundam).One of the most important thing to remain the gunpla customization in
OC should be the color scheme. Whenever the gunpla re-paint, majority of the
color selections should be similar to original color scheme. Converting gunpla
kit to another gunpla such using MG Freedom inner frame and transform it in to
Justice to make a Justice MG Format can also be categorize in OC in my
definition. As long as the end result is what we can find in gundam series, it
should categorize in OC. It might feel boring on building and customizing a
gunpla kit base on the gundam original concept but sometime, OC can be better
than PC and it can be harder to get it done especially when improving some old
MG to match up the latest MG.
Scratch build or using conversion part should also consider
in OC as long the end result is what we can find in gundam series.

 \
\Thursday, February 23, 2012
Project MG Destiny EBM AIF Detail Evolve version.. Start toh..
I know the title "Detail Evolve" is a bit too heavy (promising) for me to use. Well i should said this two words belong to Master Keita in my dictionary but i'm going to get some idea from his project (using his concept) and try to apply into this kit. Of course, it won't end up as good as he does but hopefully i can get some basics similar to it. From this project, i starting to re-evaluate my skill and what i found out is " i can say my skill in pla-plate and panel line design still in phase one". I still not good in using overlapping pla-plate, different surface panel line combination, pin-hole position as well as color separation. I guess i really need to improve these skill in the coming project before i start playing with putty, resin or re-casting parts which i think most professional modeler do ( and i always limit with supplies). While i still improving this stuff, i saw some of the pro-modeler are moving or starting on painting tiny figure recently which made me think "there is always some place to grow in modelling".
So, back to the concept i use for this kit, i do some study from other MG or MG conversion Destiny before and since this kit had been release for quite some time, there are lot of customization sample or reference for me. The thing that notice is the method or the concept of customizing kit this kit or the overall gunpla have been growing in both "following the original concept" or "fully customize on modeller's concept" Many things come into my mind when i want to write about this and i think i should write this in another post). My choice for deciding the concept of this kit will be follow the original concept which use the original color scheme, remain its own image and add some customization which study from Master Keita's MG Strike Freedom "the details that evolve" version. Since i'm lack of tools and supplies, zero knowledge on putty, most of the works i did on this kit are adding pla-plate, panel line and "some minor" armor trimming. I used to think that "Detail Evolve" concept was armor trimming and try to expose the inner frame as much as possible but i think there should be lot of definition on it and it depend on what the modeller want. So, lets check out the photos for more elaboration.

Monday, February 13, 2012
MG Destiny EBM review part 3 (Articulation, proportion, recomendation)
Alright, this should be the last post for my boss's unit. After this, i will start working on my own unit which is going to re-paint entire kit. Since this unit doesn't own by me, i only capture the photo of it without decal because i afraid while i posting it, i might damage some of the decal (maybe i will capture some photo of the complete straight build unit with complete decal and markings on the completion of the re-painted unit post).
For part 3 of this review, i will start with the articulation of this kit. Since this kit was release few years after the launch MG ver.2 (better articulation with better inner frame design) for many UC series gundam, the inner frame, joint and movement were top notch for this kit. Although the are some obstacle for the wing unit but other parts like legs, arms, torso and neck joints were all work very well. The arms can reach every weapons (there are some difficulty for the arms to reach the Double Edge 2 (beam boorang)) without any problems. Dynamic poses can be easily created from this kit with its extreme well design joints for the pegs, torso and shoulders. Some of you might think because i am Seed/Destiny fans but all i can say is, i have been not building Seed/Destiny MG for sometime. The last Seed/Destiny MG kit that i build (straight build) should be the MG Sword Impulse which was almost one and the half year ago. During this time, i have build some great articulation kit from MG Exia, MG wing and MG Sinanju till some bulk almost not moveable gunpla kit like MG ZZ and MG FAZZ. I still feel this MG Destiny is one of the best articulation gunpla kit.
The proportion design for the kit also contribute a lot for this kit to create dynamic poses. I do mentioned that i prefer on the NG 1/100 proportion over this MG version but recently, i realize why are the legs was design this way (too thin). If you check out the dynamic pose of this kit from the boxart, you can actually notice that the legs is slim ( stretch) all the way down. Although this can be done by using ultra-wide angle (around 16mm with close distance focus) lens but how many people can afford such lens and how many people actually realize and know how camera can help to stretch the proportion of the kit to look more dynamic in different poses. So, my conclusion regarding on the proportion design from this kit isn't having the legs too tall or the arms are too big but it was made to look good in different poses. If you know how to pose and get the best angle for the shots, even the normal standing post (with long and thin legs) will look very good.
Before start viewing the pictures, suggestion or recommendation for this kit customization. Of course you can't miss the reference from his MG Format Destiny conversion from Keita for those detail and the recent work i found for M.A.C forum, LotD's Destiny Evolve . These are some of the superb version MG Destiny out there. From my own recommendation, if going for original concept mod should be adding excessive detail to create some sort of "detail evolve" version since there are still lot of place where adding more panel line, armor cutting to expose more inner and PG detail painting style on the inner frame. Check out the Keita's Strike Freedom detail evolve version if want to know more on the concept of the adding detail modifications. As for other concept such as adding armors, change or add more weapon like what LotD did on his modification i can't find much example to show.
So, enough for the words and lets check out the poses. I using some of the extra clear part from the EBM version as well.

Friday, February 10, 2012
Seven6398.blogspot.com 2012 New Begining officially launch (with 2011 summary)
Last year, i mentioned that i'm going to do some renovation to this blog (i forgot last year or this year in January). Well, the renovation is finally complete. For those who have follow my blog, you will the changes i made in this blog for past few weeks.At first, i thought of making it like a upgraded version and name it as ver.2 but since i'm not good with HTML code and don't know where to find some interesting and sophisticated gadgets add into sidebar, i guess i will just name it as "The New Beginning" because i just change the look, size of some sidebar item, re-organizing and added some links. The reason i use the theme call "The new beginning" is because this year i will focus on improving the basic of my gunpla skill, creating some extremely clean gunpla kit (still with some minor modification) which will take lot of time which i mean i might not able to create lot of gunpla kit this year (patience needed for a clean gunpla kit). So, the Seven6398 is finally back from the space and floating in the sky of "Earthhhhheerdd".... (i mean the background). Here are some new thing in the blog:

First, re-design the new header with the pictures of my previous work and the size that fit the entire page.
Wednesday, February 8, 2012
MG Destiny EBM Review part 2 (parts and assembly)
Here we have the part 2. For Seed or Destiny series MG, the building sequence is a bit different from old MG kit especially from UC series ( i mean those MG come after 200X if i'm not wrong). First, it will start with the upper torso, then head unit, follow by arms, legs, waist unit, backpack and weapons. I hate build arms and legs cause i need to build the same thing twice (in MG from UC series, the sequence is a bit different which require me to build the arms and follow by legs first which save the best part at the end).
There are three four things i want to mention about here related on the building process. First will be the nub marks. For this kit, most of the nub marks are easily expose out which its not easy to cover for straight build unless i paint the entire thing or cover with top coat later on. Why? There are many color from its color scheme and its not easy to find the right gundam marker with correct color to cover it.
Second thing will be the special gimmick for most of the MG from Seed and Destiny series, sliding armors. Those armors also can be easily detach from the inner frame for painting purpose without removing some part from the inner frame. This should be one of the good thing but the counter part will not favor for painting if there is no plan for disassemble the inner frame for painting ( paint with slide, paint without slide, one for priming, one for painting).
Third thing, there are lot of detail from the inner frame ( i guess now Bandai applying this concept into armor as well, the MG Duel which come in this month). Good thing is if you want to practice on detailing the inner frame like what Matt Tomzek did on his PG GP01Fb that win the G-shot contest, you can have it in this kit and the only person i know he can did very well on this, Mr.Chang (ngeekhiong) will be the best reference. As for the detail in the armors, that will need some creativity or maybe you can refer to this post from master-killar which i check it recently.
Last thing? the building process isn't that difficult but it also require some focus on "left, right" part especially the legs. Although most of the part from the leg are duplicate to another but some do have different for left and right side (the wing unit as well). Alright, enough for the talk and you can check out the pictures now.

Sunday, February 5, 2012
MG Destiny EBM Review Part 1 (My boss first lootz)
Remember i told you guys about my boss was poison by Seed and Destiny series, these are the kits that he bought and ask me to build for him. Total of 9 MG which include the MG destiny EBM (Extreme Blast mode) in this review. He asked me to recommend what are the best kit to collect from Seed and Destiny and OO series, i recommend him about MG kit and he said he want to buy the entire MG series of it ( he almost did it). So, i brought him to some local gunpla shop and pick all MG series kit according to the series he bought and he was a bit shock there are so many MG Seed and Destiny gunpla. The best part is when i told him that there are more MG coming out for Seed series and his expression like... "er". I think that's what make him not going for the whole MG series from Seed and Destiny and OO in one time and only pick those most famous MS in those series. And the gunpla kit he bought were:
-MG Strike Freedom
-MG Infinite Justice
-MG Destiny EBM
-MG Force Impulse
-MG Sword Impulse
-MG Astray Red Frame Kai
-MG OO Raiser
-MG OO Seven Sword
-NG 1/100 Akatsuki full set
The bill was RM 1789, it was the craziest loots i ever see. Well, as for now will be the best time for me to re-sharp my skill from basic which build snap and fit project for all these gunplas. The only request from my boss is snap and fit all these gunpla with the provided dry transfer decal and markings (i will be dead if he ask me to paint all of these and he also know that it take lot of time for me to complete it if he ask me to paint all of them because i need to do review for other people as well).
Since i own most of the gunpla kit listed above (except MG OO Seven Sword and MG OO Raizer and most of mine are straight build version), i will paint my gunpla kit too since i can re-learn the everything from these gunpla while i build for my boss. It means two same gunpla kit start at the same time which one will be straight build for my boss and the other one will be fully painted (might add details) for myself (Feels like the professional style, haha, unfortunately i'm not in that level yet T_T).


Monday, January 30, 2012
SRG 1/144 Alteisen Complete
So, the end result of the project SRG 1/144 Alteisein reboot is finally here. It can be said as my first completed kotobukiya kit.
Since this is the first kotobukiya kit, there are lot of thing for me to test and check whether how should i modified the kit. I'm using some simple concept as usual such as adding pla-plate, scribing panel line and re-paint the entire kit. One of the techniques that i test on this kit is adding "metal pin" by using normal paper clip into the kit (you may find it on the legs and shoulder) through some drilling process. Another modification was done on the waist which i cut off the lower torso from the waist unit and add a joint in between it so it can have turn-able waist. Since it is the first time on adding "metal pin" and adding joint for the waist, it can be said as a test and i didn't take any photo on it as WIP because i don't know will it work out or not. Before we go into the next paragraph, here is the check list for paint:
-Mr.Surfacer 1000 as the base (prime)
-White (Mr.Color White)
-Red (Mr.Color red combine with Mr.Color Metallic red)
-Black (Mr.Color Black)
-Gold (Mr.Color Gold)
-Panel line (Enamel wash from Tamiya dark blue) and (the Mitsubishi 0.1 pen)
The painting process for this kit is quite simple since the original color scheme of this kit is not that complicated. Most of the part are separately and only minimal masking require legs left arm's canon. I was lazy to mix out the yellow or orange so i replace it with gold color. The enamel wash technique really helps a lot on reducing the masking process.
In terms of posing this kit for photo, this is the process that make me headache. First, i thought the paint will tighten the joints because the joint was too loose but i think the original design is like this. I should say this is the design flaw for the joint even though this kit does came with polycaps. This is the reason why only 20 photos with few poses are made. The worst part is, the articulations for this kit is extremely limited and the oversize shoulders make things even worse. Good thing is this kit come with great proportion and all i need to do is get the right angle for those shots.
Enough for the words, lets check the photos.

Subscribe to:
Posts (Atom)